Mari Wells Coyle

Mari Wells Coyle
Mari Wells Coyle, Winemaker l photo by Freda Banks photography

CHERRY CAPRESE


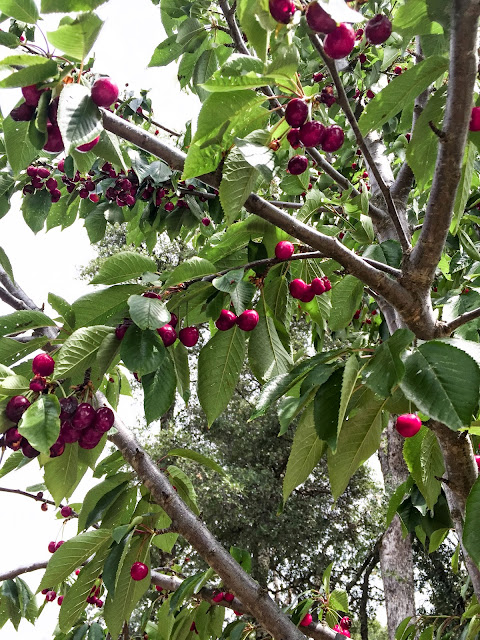
Cherry season is just a fleeting moment of time. The crop is susceptible to changes in spring weather and one minute our tree is full, the next minute the birds have eaten EVERYTHING. I love getting the whole family out to pick cherries and creating lots of savory foods and sweets. My husband decided to go cold stone creamery style and roll fresh cherries and chocolate chips into vanilla ice cream. YUM!

We harvested our cherries in two picks this year. One a little less ripe-tangy with lots of acid. Another pick was juicy sweet and more complex in flavor.


Cherry is one of the basic fruit descriptors found in many
rosé and red wines. It's often the first fruit flavor recognized because of it's familiarity and it is characteristic across many grape varietals. Descriptors can range by type of specific cherry-Bing, Rainier, and black to name a few-all the way to cherry cough syrup.


Like olives, sometimes it's best to pit them. In this recipe I use a stainless cherry pitter that I purchased primarily to help my kids develop small motor skills. I really love this tool because it takes out the pit and saves all the fleshy fruit. 


I created this recipe to pair cherry and basil. I love the sweet, spicy, and tangy flavors. The cherry component really matches a wide array of wines and makes a great side dish for summer grilling. I'm taking this to a Memorial Day BBQ this weekend! 


Cherry Caprese Salad


Additions:

3 C pitted cherries, halved
8 oz. fresh mozzarella, sliced
2 C basil
2 T olive oil
2 t balsamic vinegar
Balsamic glaze
salt and pepper to taste

Protocol:

Place the mozzarella on a plate, top each piece with fresh basil. Carefully, mound cherries on the basil leaf.

Drizzle with balsamic vinegar and olive oil.

Add salt and pepper to taste. 

Top with balsamic glaze and enjoy!


 Winemaker's notes:
The cherry flavor compliments the similar flavors in
rosé and red wines. The basil adds spice. You can add this side dish to your BBQ and sip Barbera, Pinot Noir, Zinfandel, Cabernet Sauvignon or Sangiovese. 


My recipe for a spring kitchen makeover


As an eternal optimist, I love the newness the season brings. There's a reason we quicken activity and begin to clean up. The excitement never ceases in springtime-moody weather and lots of color popping in the landscape.

Through my journey as a winemaker diving into communications, I've come to appreciate and love a neutral landscape to really SEE the beautiful things in life. First, photography put this perspective in focus. The simple concept that white plates make food look awesome was new to me. Well, if white plates make food look awesome, does white bring texture and life to other things? I started to notice that without the distraction of colors, I could focus on the subjects that gave me inspiration and joy. I was starting to rethink some of my surroundings at home when a friend suggested incorporating color pops from a neutral southwestern palette. With a love for the desert landscape filled with wildflowers-coupled by just having read Marie Kondo's book-I decided to neutralize my home interior and let let the colors of life do the popping. With two little boys and a firefighter husband, there is never a dull moment around here and if you're distracted by anything you can miss some of the best ones.

I caught the bug and I knew I had to seize the moment, but where to start? Here I develop a recipe to give your kitchen and dining space a spring makeover.


So much of what inspires me are the natural elements.

This is the color palette that I developed from some 
objects that I've collected over the years.
I use Benjamin Moore paints. From top to bottom Lingerie, Cocoa, Head over Heels, Smoke Embers, and Sparkling Wine.


I found this piece of granite on one of our whitewater adventures.  I love the natural color palette that mimics the wood cabinets in my kitchen.


I began in my kitchen, which is actually my other office and had been deep red. I had always loved a red kitchen-perhaps what really inspired me to cook and create recipes. 

With a simple coat of paint the whole kitchen is feeling a little more industrial, tranquil, and full of good vibes.

Now I can really SEE my boys blue and brown eyes at the breakfast bar each morning. Their eyes just pop out at me now in the neutral gray backdrop. A thrill that truly never fades.


.


Spring break in the desert inspired me to make this collage of natural color pops. Throughout the process of changing up my home space, I'll be looking for ways to incorporate some of these colors by using vases, throws, pillows, rugs, and other unique functional pieces.


Continuing on my Marie Kondo simplicity buzz, I decided to take the paint roller right over a mural that had NOT been sparking joy. The mural was part of our home that we purchased just over 5 years ago and I decided to live with it for while until I thought of a better idea. Amidst the mood of change, I surrendered to the spirit of spring cleaning and minimalism-anything that doesn't spark joy must go. Anyone that has read The Life Changing Magic of Tidying Up will tell you that is in fact life changing.

I chose a pale pink to put in the dining room which is actually a great room. To me, pink is a color that evokes intimacy, beauty, and calm.  I'm hoping to foster intimacy in a spacious open environment to allow the food, wine, and conversation take the stage.

Recipe for spring makeover in your kitchen

1. Find a few items that inspire you and have visual appeal
2. Make a color palette that mimics those objects
3. Choose colors that bring desired emotion into your space
4. Sort the kitchen tools that you enjoy using and keep them in a space where you can access them easily or display them on the counter top.
5. Start creating delicious and beautiful food and wine at your table.


This is the before photo of the mural. I'll post the final look as I finish it up. 

I hope you will find ways to give your kitchen a spring makeover that inspires you to tackle the farmers market and source your favorite wines to enjoy the bounty summer will bring to your table.


Cheers!

Mari


Rustic Beet Pizza


Want to create a rustic bistro vibe for Valentine's day?  
I know that not EVERYBODY is a romantic. So, I want to share this little slice of love with anyone who doesn't have big plans tomorrow. This pizza is about as rustic and easy as it gets, but a little more special. It can be shared with friends, kids, or the love of your life.


Rustic Beet Pizza
Makes 2 heart shaped pink pizzas

Additions:

Dough

1 C lukewarm water
1 pkg dry active yeast
1/3 C beet puree
1 T maple syrup
dash of truffle salt (or sea salt)
2 1/2 C all purpose flour

Beet Sauce

2 C beet puree
4 T orange juice
1 C water
4 T red wine vinegar
1 t onion powder
1 t minced garlic
dash of salt

Toppings

1 log goat cheese, softened
1 small head radicchio, finely chopped
2 C cherry tomatoes, halved
1/2 C parsley, chopped
Olive Oil
Parmesan, freshly grated


 Protocol:

1. Beet Puree: Heat Oven to 400 F. Peel approximately 5 beets and place in foil. Cook until soft, approximately 55 minutes. Remove the beets and place in a blender. Add a little water, about 4T, to blend beets into a puree. This can be done ahead of time. 

2. Pizza Dough: Begin the pizza dough by adding water, yeast, salt, and maple sugar in a large bowl. Mix together using a wisk until small bubbles form. Add beet puree and continue to wisk. Slowly add 1/4 C of flour at a time and wisk until dough begins to form. Once dough has formed, use a wooden spoon to continue stirring, adding the flour step by step. If the dough feels VERY sticky, add a bit more flour until you can knead the dough for 1 minute. Cover the bowl with a towel and let rise for 1 hour. The dough is pink and beautiful.

3. Beet Pizza sauce: Add the beet puree, orange juice, water, garlic, onion powder, salt, and red wine vinegar to a small saucepan and cook on low heat, stirring constantly, until all the excess moisture has evaporated, about 15 minutes. 

4. Roll out 1/2 of the pizza dough on a floured surface into a heart shape. Place on a hot grill, about 400 degrees, or in the oven at 400 degrees,if you prefer, on a baking sheet. Cook the dough for about 10 minutes or until it feels like flatbread.

5. Remove from the grill or oven and turn over to place the sauce and toppings on the side that was on the grill or baking sheet. Remember that this recipe is for 2 pizzas, so use half of the sauce and toppings for each pie. First spread goat cheese all over the pizza. Then place sauce on top, tracing the heart shape. Finally, add chopped Radicchio, tomatoes, and fresh parsley. Cover with grated Parmesan cheese.

Yum! The flavors are sweet and earthy and leave a great palate to ease right on in to some dark chocolate to finish up the wine...

Enjoy with a bottle of Mourvedre. This could be from Spain, California, or France. If you aren't familiar with the varietal, ask your local wine shop for some suggestions. Or check out my delectable profile to see what I've been drinking.


Winemaker's Notes: More Mourvedre please! I love that it's earthy and bright. Some of it's descriptors often include plum flesh, gamey notes, and seamlessness. It's deep profile is intriguing, like getting to know someone over candlelight. When I match earthy flavors with this wine, it sings of bright purple plum flesh. The structure is weighted, but quickly transitions to a velvety finish. It's over all rustic charm lends to a down-to-earth (and a little sexy) pairing with these earthy and sweet flavors. 


Cheers!

Mari


Crushed Lemon Bars


Lemon bars are one of my favorite treats with wine. The essence of the citrus complements many wines and is the perfect balance of sweet, savory, and acidity. I was so fired up to make some lemon bars from the Meyer lemons that gracious friends have been gifting me this season. Their aroma is captivating! 


While searching for the right recipe, a dear friend from my college days at UC DAVIS came to visit with a bag full of lemons from her tree in the Napa Valley. 


A great visit with an old friend can leave you completely inspired. We shared down-to-earth ideas about food, travel, and gardening over a few glasses of wine. I accumulated lists of books to read, cookbooks to taste, biodynamic cosmetic companies to find online, and dates for family travel. She is not only a viticulturist, but a master gardener, so I even had a list of things to do to revive my culinary garden from her white fly diagnosis. As I'm writing this, I'm still giggling from a few things we recollected from college. 


Of course she had the best lemon bar recipe in hand. This recipe uses the whole lemon. My kind of recipe! I love to use crushed fruit and get the flavor from the skins-just as I do with my winemaking protocols. I love the richness and texture edible skins contribute.


Crushed Lemon Bars-adapted from David Lebovitz's 


Additions:

Shortbread
1 c flour
1/4 c sugar
1/4 t salt
8 T melted butter
1/2 teaspoon vanilla extract
Lemon Topper
  • 2 small organic Meyer lemons
  • 1/2 c sugar
  • 1 T freshly squeezed lemon juice
  • 3 large eggs, room temperature
  • 4 t corn starch
  • 1/4 t salt
  • 3 T melted butter
  • powdered sugar for sprinkling

Protocol:


1. Preheat the oven to 350ºF 
2. Line an 8-inch square pan with foil.  
3. In a medium bowl, mix the flour, 1/4 cup sugar, 1/4 teaspoon salt, 8 tablespoons melted butter, and vanilla, until smooth.
4. Smear the batter into the bottom of the pan, using your hands and a small spatula to get it as even as possible.
5. Bake the crust for 25 minutes, or until it’s golden brown.
6. Cut the lemons in half and remove the seeds.
7. Put the lemon in a food processor (or mash with a muddler or back of wooden spoon) then mix with the sugar and lemon juice. In the food processor or blender, add the eggs, corn starch, 1/4 teaspoon of salt, and 3 tablespoons melted butter, and blend until mixed well. I like to have the consistency as chunky as possible, but we agreed that they are more kid friendly when mostly smooth.
8. Remove the crust from the oven and reduce temperature to 300. Pour the lemon filling over the hot crust (this is key to make sure the topping adheres to the crust) and bake for 25 minutes or just until the filling stops jiggling.
9. Remove from the oven and let cool completely. When cool, carefully lift out the bars using the foil. Cut the bars into small squares or triangles. Sprinkle sifted powdered sugar over the top just before serving. Yum!


Enjoy with a glass of Rose and soak up some of the brightest moments of the winter season-always spent best with great friends. Thanks for the inspiration and the lemons Kendall!


WORK & LOVE


Welcome 2015 


Each year I write my intentions for the New Year. I've been trying to get away from the classic New Year's resolution (the kind that are so easy to break) I think you can relate. < Wink Wink > Alternatively, these intentions are inspired by truly wanting to seek more out of life and placing intentions that will push me beyond just another short term goal. This year I have intended to place gratitude in work.

Coincidentally, during the Golden Globes, I heard a Julianne Moore express her gratitude for being a happy person, which her mother defined as "a person who had WORK & LOVE."   

This really resonated with me as my work is so much a part of my happiness. I truly have gratitude for the work I do and all the love from my family.

Often times, cooking transports me to that happy place where WORK & LOVE coexist. I love to work through recipes and ideas to give back to my family. Connecting with my readers keeps this kind of work meaningful because I get to share it with you. I love to hear about how you find happiness in cooking. Next time you read a post, push the comment button and share.

What are your intentions for the New Year? 

Wishing you happiness, love, and work.

Cheers!